rv-7
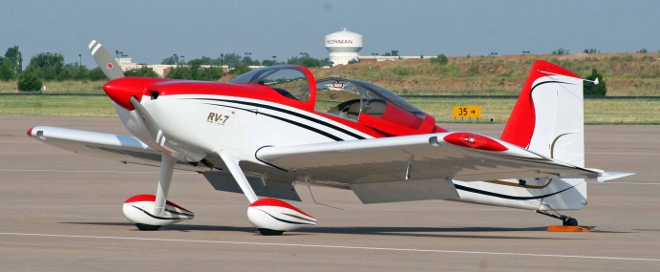
Van's RV-7 lends itself very well to additional fuel for owners who use their aircraft for cross country operations. Shortly after ER Tanks for the RV-6 hit the market, RV-7 "drivers" were wanting tanks for their "rides". Of course, HWA stepped up to the plate!
Specifications:
Weight - Total System Weight = 15 pounds
Capacity = Approximately 9.0 Gallons (~4.5 per side)
Method of Transfer = Electric Fuel Pump Transfer
Wing Tips we can accommodate - Van's W715, W715-1, and Van's "Old School" Tips (Old School Tips were Van's original "flat top" tips sold with the standard RV-4 and RV-6 kits. Many have been installed on RV-7's)
System Description / Operation:
ER Tank Systems are comprised of two tanks (one for each wing), pumps, hoses, tubing, fuel caps, hardware, and all the fittings required to perform the installation. The only components not supplied are electrical switches (X2), circuit protection, and a dollop of Pro-Seal. Each tank holds approximately 4.5 gallons, adding nearly 9 gallons to the total capacity of the RV-7.
ER Tanks, for the RV-7, utilize a "Pump Transfer System". This system uses an electric fuel pump to transfer fuel from the ER Tank to the main tank. When the pumps are not energized (OFF), they acts as a valve, preventing the fuel from flowing in either direction.
Fuel flow is controlled by two single-pole, single throw switches in the cockpit. A single 18 gauge wire is sufficient for the circuit. The pumps are grounded "locally". When the switches are flipped, fuel moves from the ER Tanks to the MAIN tanks. (Each ER Tank is vented individually).
If we were to feed the engine directly from the ER Tanks, which we do not, each ER Tank would require a sump and fuel indicator. By pumping the fuel into the mains, we can utilize the sump and fuel indicators from the main tanks. The Installation Manual goes into further detail but the gist of it is to transfer fuel the same time, every time. By doing so, you learn what a normal transfer "looks" like. Once you complete the installation and testing, you'll have total confidence in the system.
Normal operation (in flight) will require you burn enough fuel from the MAIN tanks to transfer the entire contents of the ER Tanks. Fuel should be transferred simultaneously from both ER Tanks only during straight and level flight. This prevents imbalances in the aircraft, and eliminates the requirement to keep re-trimming the aircraft. If you transfer individually, one wing would keep getting "lighter", requiring constant trimming of the aircraft. Although we recommend transferring both tanks simultaneously, we recommend using individual switches for each ER Tank. In the event of an electrical failure, such as a popped circuit breaker, you would still have access to the fuel in one of the ER Tanks. If both transfer pumps were on the same circuit, and you had a failure (circuit breaker/fuse), you would not have access to fuel in the "other" ER Tank.
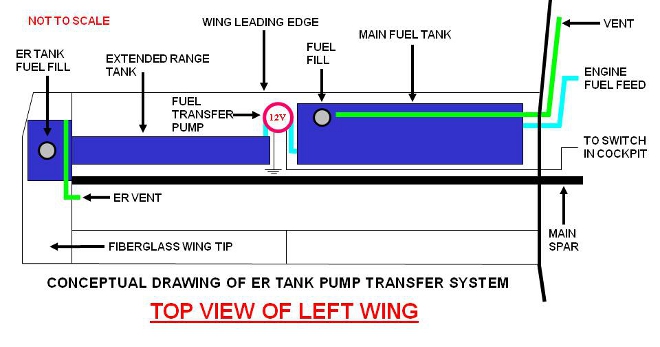
Below you can see how the ER Tank is located just ahead of the wing spar. This configuration minimizes changes to the empty and operational C.G. characteristics of your airplane.
The empty weight of the entire ER Tank System (Left & Right) is 15 pounds but you will still need to re-calculate the weight and balance data for your aircraft and incorporate this information in your revised flight operations manual.
All ER Tanks are pressure tested for integrity before shipping. No welding is required by the customer. (Some images may depict ER Tanks during the fabrication process, and may not represent the finished product.)
ER Tank Systems include a SAMPLE Flight Manual Supplement and recommendations for testing and transferring fuel. However, it is up to the owner/builder to perform proper flight testing, procedures, and insure proper in-flight ER Tank operation.
See the "Benefits" link from the horizontal menu bar above to learn why ER Tanks might be an excellent addition to your RV-7.
Aerobatics:
Aerobatics are not authorized when ER Tanks contain ANY amount of fuel. Owner/Operator must stay within Van's recommendations for aerobatic flight. We have NOT conducted Spin Testing with ER Tanks, as a result, we DO NOT recommend spins in aircraft equipped with ER Tanks
Things to Consider:
If you're contemplating the installation of ER Tanks in your RV-7, you should consider purchasing a "Bung Kit". Select the "Bung Kit" link from the horizontal menu bar above to learn why this might be a good idea.
Options:
The only option we offer is an Inspection Panel Kit for $75. One kit has enough components for both wings. In other words, one kit per aircraft is all that's required. PLEASE NOTE: Some newer wing kits already have a pre-cut hole that may not be ideal positioning for our access panels.
The kit contains panels, reinforcement rings, hardware, and instructions that allow the installation of an access panel beneath the wing for pump/hose access. The panels keep you from having to pull the main tanks every time you want to perform an inspection or maintenance. I think it's a great idea whether you buy our kit or fabricate your own. If you're "on the fence" as to whether you'll be installing ER Tanks, we suggest installing the Inspection Panel Kit before you paint the aircraft!
Installation:
ER Tanks must be installed in a completed wing. If you install the tanks before the wing is finished, you may not have access to buck the wing skin rivets. Of course, it's more efficient to install ER Tanks in a aircraft that's under construction but they are intended to be easily installed in flying aircraft, too. I would estimate 25% of ER Tanks sold are installed in aircraft that are already flying.
Allow three full days for installation. If you're aircraft is still under construction with the wing root fairings and wing tips removed, and no worries regarding paint, you're installation will go a little quicker. However, nothing about installing ER Tanks is difficult, it's just takes some time. For the most part, ER Tanks can be installed by one person but there are a few "moments" when having two people can really speed the process.
ER Tank Kits are very complete. About the only thing not included in the kit is Pro-Seal. You'll only need a dollop (about the size of a golf ball) for the entire installation. If you don't have any, check with builders in your local area or put a request out on one of the online forums. (Make sure it's not expired)
Installation Services:
If you're not up to installing ER Tanks yourself, HWA offers installation services. For more information, click on the "Installation" tab of the horizontal menu above (Under "Fuel Tanks")
How to Order:
Due to the popularity of ER Tanks, and the expansion of our product line, there has been a backlog for ER Tanks for quite some time.
Please click here to order.
Wing Tips:
Two seat RV's have been produced with 3 different types of wing tips. We need to know which ones you're installing on your aircraft. I'll do my best with verbal descriptions, but I've attached an image to help clarify the issue.
The 3 types of wing tips most common to the RV-7 are:
"Old School" - These are the original tips provided in the original RV-4 and RV-6 kits. The "old school" tips are flat on top, essentially extending the upper wing skin to the outer edge of the wing tip. The bottom surface of the fiberglass wing tip curves upward to meet the straight upper surface. The outboard edge of the wing tip runs parallel to the tip rib of the wing. (The other two styles taper) There were no factory cut outs for the lights (that had to be done by the builder)
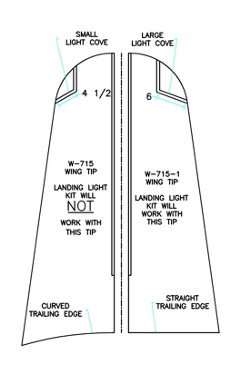
Van's part no: W-715: The bottom of this wing tip is flat and the upper surface curves downward. The tip also gets wider as you move aft along the tip rib. These tips were originally introduced on the RV-7 and give the aircraft a slightly longer wingspan, as well as a "bat wing" appearance. The most distinguishing characteristic is the curved trailing edge as shown in the attached image.
Van's part no: W-715-1: At first glance this wing tip resembles W-715, but it has a straight trailing edge. It also has a larger cut out area for mounting landing and position lights.
The first step is to compare the upper surface of the tips. If it's flat, it's "old school". If it's not, it's one of the two shear tips. The attached image will show you how to quickly determine which tips you have. If you have any problems, please don't hesitate to contact me. We want to be certain since ER Tanks are not interchangeable with the different wing tip styles.